Categories
arts how to identity

Art Education Lesson on Identity Using Color Swatches

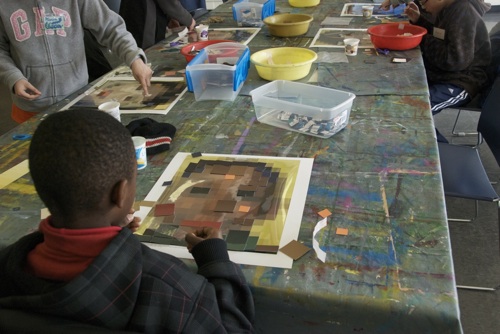
Students glue squares of color on paper to represent faces

Justine Bursoni is a graduate student in art education at the University of Illinois Urbana-Champaign and an editor for the online magazine Smile Politely. She came across my Self-Portrait art piece online and wanted to include it in a lesson plan for a group of fifth and sixth grade students. She asked how I created my piece, and after giving her some tips, she had her students create their own paint swatch portraits.

“During the lesson,” Justine wrote in email, “the students were quick to note how identity comes in different forms, parts of identity can be shared… but mostly, one’s identity is unique and multi-faceted and how all should be recognized and tolerated.” It’s humbling to have my work aid that learning process, and even more humbling to be included in the list of self-portraits she used in her lesson plan:

I also want to thank Justine for allowing me to post her PowerPoint presentation and lesson plan. The PowerPoint notes include her comments on the students’ reactions:

In the vein of open collaboration and online sharing, I put together some notes from our email conversation to provide a list of steps to help others create their own pixelated portraits.

How to Build a Portrait Out of Square Blocks of Color

In my case, I used Photoshop to create a reference image first. For best results, choose an image where the face has a solid color background. You’ll want to follow these steps in Photoshop to get the right result. These steps assume you’re printing the reference image on a standard 8.5×11 inch sheet of paper.

Photoshop Instructions

  • Open and Crop: Open your image in Photoshop. Using the Crop Tool, crop it down to just the face. For this exercise, hold the Shift key while using the Crop Tool to make the crop a perfect square.
  • Reduce to Pixels: Go to Image Size (on the top menu, Image > Image Size). Under Pixel Dimensions, change the units to “pixels” and adjust the width and height to 8 for both. This will end up giving you an 8×8 grid of one-inch squares. Important: Make sure the check boxes for both Resample Image and Constrain Proportions are checked. Select OK.
  • Set Document Size: Your image is now 8×8 pixels. But you still need to make a second adjustment to the image settings before it can be printed correctly. Go to Image Size once more. Important: Uncheck the Resample Image check box. Under Document Size, set the units to “inches,” type in 8 for width and 8 for height. Select OK.
  • Print: Everything is done and you’re ready to print. From the File menu, select Print :)

The final step in creating your pixelated portrait depends on your eye to match the colors. One tip I can offer is that the “value” or black and white levels of each color are more important to recognizing the final image than the “hue” of the color itself. For people to recognize the original image, it’s more important that it have the right amount of contrast than perfectly matching the nuances of each color.

If you do use this process to make your own, I’d love to see your project. If you have a place to upload images, post a link and describe your project here in the comments. Otherwise, send me a note and I can help you post it online.

Special thanks again to Justine for allowing me to publish her class materials and for sending the photo. Seeing that image of them working on their self-portraits puts a huge smile on my face. It’s truly rewarding to see an idea I had almost seven years ago come back to life in the hands of these young minds.
Categories
citizenship how to photo politics video

Guide to Shooting Video or Taking Photos at the Polls

I’ve taken my camera with me to vote for the last several elections resulting in both good and bad experiences. When San Diego used touch-screen machines for the first time, I was able to get a shot using my digital SLR. On another election day, I was stopped and aggressively questioned by a poll worker for trying to take a cellphone photo.

Here’s the problem. The legality of cameras inside polling places isn’t black and white; the laws vary state by state. Plus, some poll workers have only received basic training and will apply their own judgement. The Citizen Media Law Project suggests four things to avoid getting yourself into trouble: follow the rules, be discreet, don’t interfere with voters or the process, respect the buffer zone.

In California, election codes aren’t particularly clear. They prohibit recording within 100 feet of anyone entering or exiting the polling place with the intent to dissuade others from voting. This is where the above guidelines come in; stay low-key and they’ll likely leave you alone. I spoke with the San Diego County Registrar of Voters and they said photography and video will be allowed up to 25 feet away.

While inside the polling area, California Elections Code says you must be in the process of voting (i.e. not using a camera), are limited to 10 minutes, and can’t show your vote to others (i.e. not documenting your vote). While it doesn’t specifically state “no cameras allowed,” legal precedent hasn’t cleared up the specifics. Government officials err on the side of caution. The California Secretary of State’s office says it has “historically taken the position that use of cameras or video equipment at polling places is prohibited, though there may be circumstances where election officials could permit such use.” When I spoke to the San Diego County Registrar of Voters, they said they won’t allow cameras inside the polling place except for credentialed journalists.

From a certain angle, this all seems very oppressive. This is a free country and I should have the right to video my vote, right? Yes, but other voters should also have the right not to be surveilled while voting. Poll workers are commissioned to protect the vote and can kick you out, even calling the police if you cause enough of a disturbance. This can all be avoided by sticking to the suggestions mentioned above. Pay attention and be careful not to record other people unwillingly.

Publish Your Photos and Videos on Election Day

  • YouTube and PBS have partnered with Video Your Vote to gather first-hand accounts on election day. They’ve arranged the videos on a map to note voter intimidation and other problems at the polls.
  • The New York Times’ Polling Place Photo Project collects images to create “an archive of photographs that captures the richness and complexity of voting in America.”
  • Video The Vote is a watchdog group organizing people to document voter suppression and other problems.
Categories
media photo politics web

Shooting the Next President

(Attn. Homeland Security: In photography, “shooting” is a term we use for “photographing” someone. You know, as in “photo shoot.” So no need to worry. And by “worry”, I mean wiretap, surveil, or put me on a list. I’m not a terrorist.)

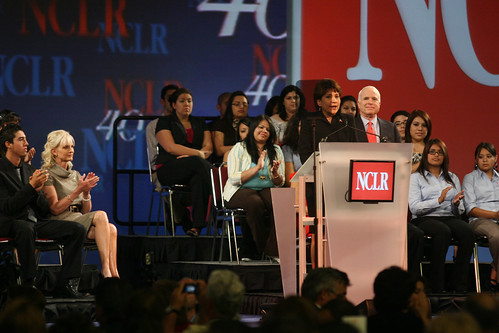
In July, I was fortunate enough to get the photo assignment to shoot presumptive presidential nominees John McCain and Barack Obama. They visited San Diego for the National Council of La Raza conference.

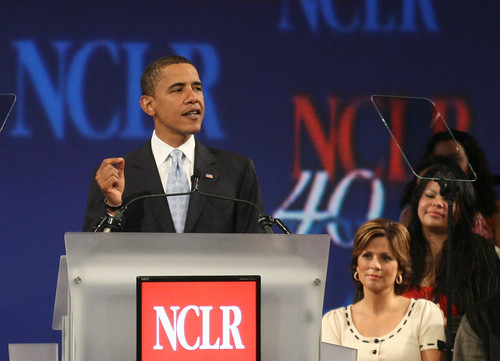
Barack Obama at the National Center of La Raza Conference

Obama Speaking

Obama delivered a speech punctuated by applause. But it was still a bit lukewarm compared to what I expected. I’d heard stories of his charismatic delivery and rockstar-like receptions. That was all there, I guess, but there was a lingering stress in the air. Obama needed to get defeated Hillary Clinton supporters excited about voting for him. He got loud cheers in reference to oppressive immigration raids, but applause was absent from his discussion of details: securing the border first, path to citizenship starts at the back of the line, fines for non-legal status, etc. When the speech was over, he shook hands with the students seated behind him and made his way slowly through the front edge of the crowd.

The press were given a sideline area at about half-court in the convention center’s large ballroom. My 70-200mm zoom lens only got me close enough for a decent medium-wide shot. I had to crop the shot above by 50 percent to get something usable. At this distance, my lens looked pretty weak compared to the pros bumping shoulders next to me — the ones you see at sports games with what look like space-age sniper rifles. I was disappointed that I wasn’t able to get closer and, more specifically, that we weren’t allowed to get any closer. The only concession was being taken two-by-two into the center aisle for about 60 seconds, once.

John McCain at the National Council of La Raza Conference

Introducing John McCain

McCain’s appearance had a dramatically different tone. For starters, his wife Cindy McCain accompanied him on stage. It felt warmer than Obama’s solo performance, somehow less formal and more classy at the same time. I couldn’t help thinking McCain scored a few extra “family values” points with the Latino crowd. He spoke not as if he were trying to impress, but as if he were having a conversation with friends. He took questions from the audience after his speech. And after conference organizers said the Q&A session was over, McCain threw the microphone into the crowd to take another question.

Before the speech began, there were rumors that we’d be escorted in small groups to the front lines. Apparently the McCain people caught wind of photographer’s complaints and agreed to allow us better access than during Obama’s speech. The conference staff members I spoke with said the campaign staff set the rules in terms of press access, not the conference itself.

Conclusions

McCain’s performance was definitely the most interesting of the two candidates, not only in terms of his interaction with the crowd but in his campaign’s interaction with the press. But I’m not sure how much of a difference it makes in the end. Of the photos I uploaded to Flickr, Obama’s mediocre shots have been viewed more than twice as much as McCain’s more dynamic photos. And of McCain’s, two-thirds of his views come from the photos of his wife Cindy.

We don’t learn anything terribly valuable from these numbers. Yeah, Obama has more buzz than McCain. And on average, Cindy McCain has more than either of them. Perhaps it’s really only an indicator of the superficial nature of the statistical mob. We can only hope the people vote based on their version of who will be the best president, not merely on who will be a best looking one.

Categories
history media photo video

Flash Lamp Photography: Behind the Scenes of an NPR Interview

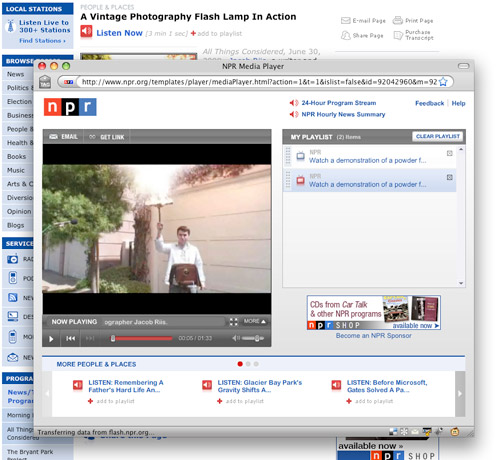
I met Race Gentry standing with his antique camera and vintage flash lamp outside his mother’s home in La Jolla. I was there to record audio for an All Things Considered story and shoot video to accompany the interview on NPR’s website. Race is one of the few people around who uses the 100-year-old technique.

Screenshot of NPR media player

In typical tape sync fashion, Robert Siegel spoke to Race by phone. I stood next to Race, holding the mic six inches from his mouth — my recording of his voice would later be combined with the host’s voice by NPR editors, giving the conversation a higher quality, natural sound. Unfortunately, we had to stop the interview every few minutes because of the military flights going in and out of MCAS Miramar. We were also interrupted for trash collection. And again for recycling.

Race explained the process of pouring the powder in the tray, setting the percussion cap in place, pulling the trigger to ignite the cap, and the explosive flash that follows. The first flash lamp he demonstrated with wouldn’t fire. He was using toy paper caps, but the humidity or bad luck kept it from firing. He switched to another flash lamp that uses rare, original percussion caps. That definitely did the trick. The massive smoke cloud was pretty impressive.

Take a look at the final video, listen to the interview and hear the flash lamp sound. Race Gentry also has his own flash lamp videos on YouTube.

Categories
download media video

Interviewed for Google Map Case Study

Google used KPBS as a case study for the Google Map we created during the San Diego wildfires in October 2007. They stopped by the studios to interview some of us who worked on KPBS’ fire map.

Categories
download photo video

Two Hour Time-Lapse at Work

I just got a new camera gadget, the Canon Timer Remote Controller TC-80N3. This is the main tool that Ross Ching uses to make really amazing time-lapse videos. Check out Eclectic, Eclectic 2.0, a behind the scenes video, and some great press he’s been getting.

I had my camera at my desk after taking a photo at work and decided to test out the new timer. The video spans two hours in 20 seconds. I was listening to the Citizen Voices interview from the photo, working with Kelli Enger on producing web videos about the authors of Three Cups of Tea, talking with Angela Carone about future projects, and having birthday cake and ice cream for Gloria Penner’s birthday and mine.